Orders
When something is bought or sold in Xena, the process begins with the creation of an order.
There are two types of orders in Xena: sales orders and purchase orders.
Sales orders: With sales orders, you can send quotes and order confirmations to your customers as well as post and send invoices and credit notes. If you use stock management, you can also print pick lists and post delivery notes.
Purchase orders: With purchase orders, you can send purchase orders to your suppliers as well as post purchase invoices and credit notes. If you use stock management, you can also post delivery notes from your suppliers.

Create a new order
Orders can be created in several places in Xena:
Via the menu Sales/Purchases > Order > Create order
Via a partner
Via a project
Via subscription management
Via reordering (requires stock management)
Via the + icon in the top right corner of the top bar
When creating sales orders, you have the option to use templates. Templates can save you time and reduce errors, as a template pre-fills fields with a standard setup.
➡️ Templates for sales orders
Once you have created the order, you need to add order lines/article lines, after which you are ready to create a quote, invoice, etc. Read more about this in the following sections on sales orders and purchase orders respectively.
Sales orders
Via a sales order, you can generate a sales invoice, which posts revenue for the sold services/articles. If you use stock management, a cost of goods sold is also posted on the associated article group.
The partner on the order becomes a customer, and if the customer and article are subject to VAT, output sales VAT is also posted.
Functions for reports and documents can be found in the order menu (three dots).
1: Send a quote
Via the order, you can generate a quote and send it to the customer.
➡️ Read more about quotes
2: Send an order confirmation
This step is only relevant if it is part of your normal business procedure to use order confirmations. Before sending an order confirmation, you can add a delivery address and delivery note on the Delivery tab.
Select Create order confirmation in the order menu. Here you can choose whether the document should be printed or sent by email. You can also choose to confirm only part of the order by selecting Partial order confirmation.
Once the order confirmation is created, the tasks are locked for further editing. If you want to edit the lines again, you can delete the order confirmation via the task menu (three dots) and select Delete order confirmation. You can then edit and create a new order confirmation.
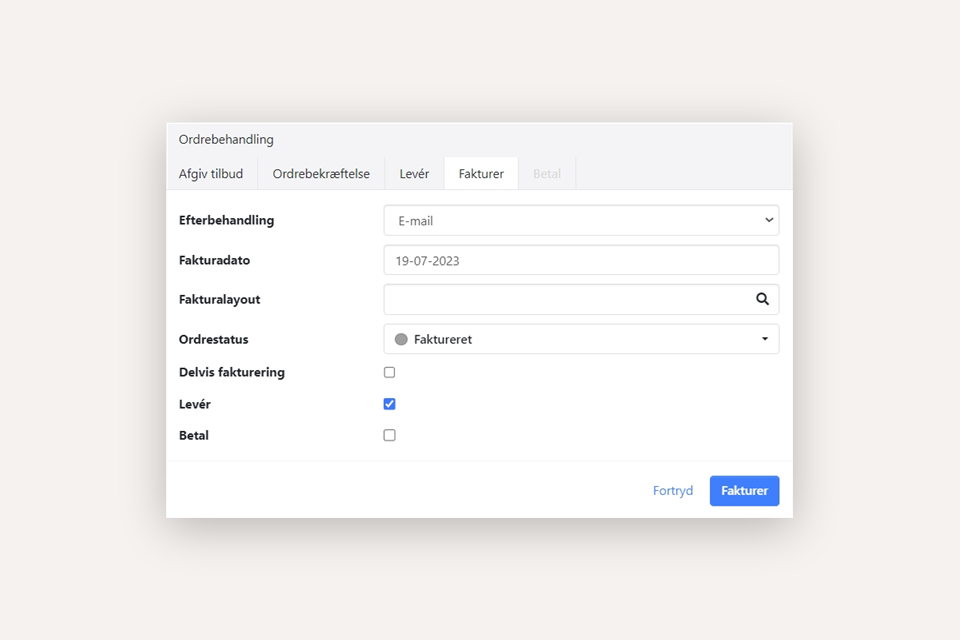
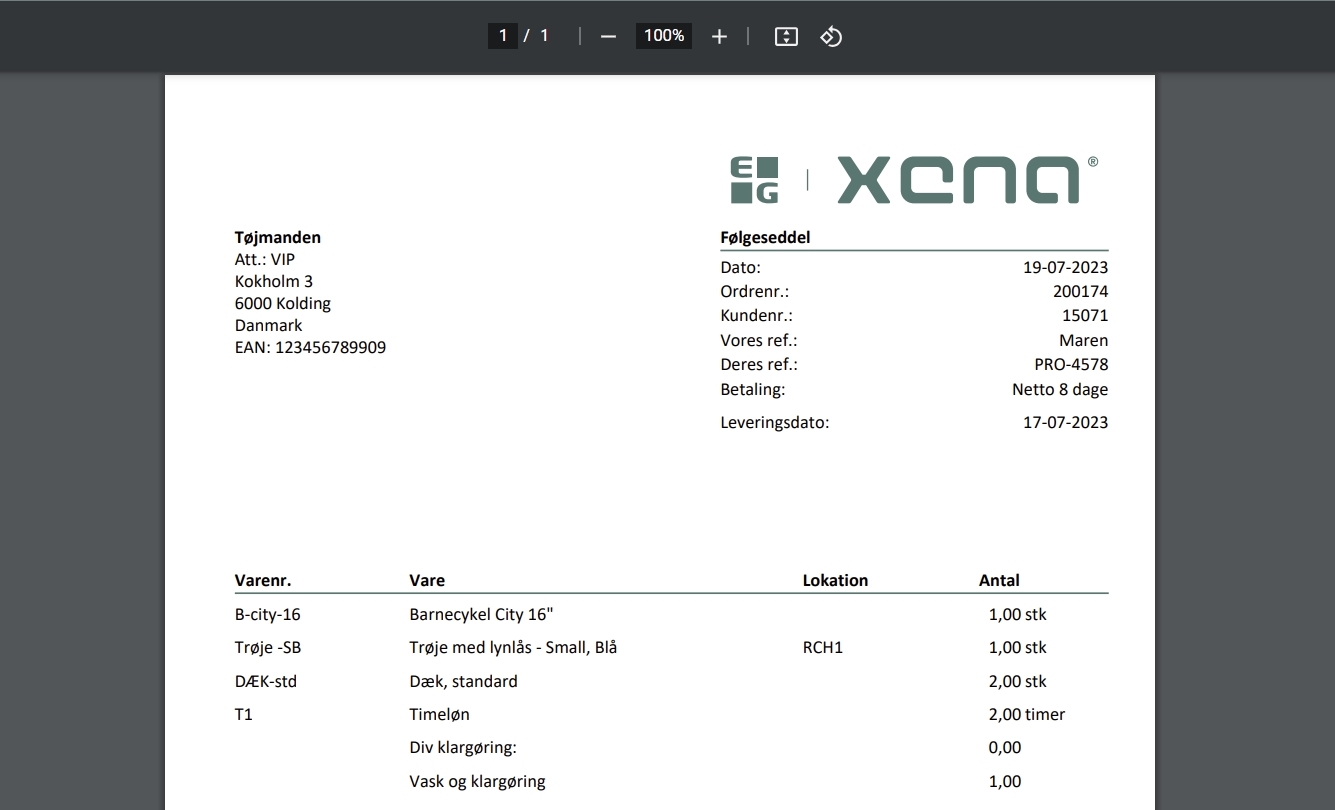
3: Create delivery (stock management only)
This step is only relevant if you use stock management. When the articles have been physically picked from the warehouse and are ready for delivery, you can create a delivery. You can also choose to skip this step and post the delivery together with the invoice.
Select Create delivery in the order menu. Here you can choose whether the delivery note should be printed or sent by email. Remember to enter the correct date for when the articles were dispatched from the warehouse. If you have only delivered some of the articles, you can post a partial delivery.
Once the delivery is posted, the stock quantity is updated and the value is deducted from your stock. A cost of goods sold is also posted. After posting the delivery, you can only edit text, price, and discount on the order lines.
4: Post invoice
Select Create invoice in the order menu. Choose whether the invoice should be printed, sent by email, or sent electronically. Also verify that the invoice date is as desired. If you use stock management and have not previously posted a delivery, remember to tick the Deliver field.
5: Post payment
As the final step on an order, you can post a payment.
Select Create payment in the order menu. Enter the date of the payment and select the invoices that have been paid. Choose the payment account the payment should be posted to. Verify that the paid amount is correct and click Pay.
Purchase orders
Via a purchase order, you can generate a purchase invoice, which posts a cost of goods for the purchased services/articles. If you use stock management, the purchase is instead posted to the stock account on the associated article group.
The partner on the order becomes a supplier, and if the supplier and article are subject to VAT, input purchase VAT is also posted.
1: Send a purchase order
This step is only necessary if you have not already ordered the articles from the supplier. Before sending a purchase order, you can add a delivery address and delivery note on the Delivery tab.
Select Create purchase order in the order menu. Here you can choose whether the purchase order should be printed or sent by email. You can also choose to order only part of the order.
Once the purchase order is created, the tasks are locked for further editing. If you want to edit the lines again, you can delete the purchase order via the task menu (three dots) and select Delete purchase order. You can then edit and create a new purchase order.
2: Create delivery (stock management only)
This step is only relevant if you use stock management. It is performed when you have physically received the articles at your warehouse. You can also choose to skip this step and post the delivery together with the invoice.
Select Create delivery in the order menu. Remember to select the correct date for when the articles arrived at the warehouse. If you have only received some of the articles, you can post a partial delivery.
Once the delivery is posted, the stock quantity is updated and a temporary value for the articles is posted to the ledger account Unpaid stock. After posting the delivery, you can only edit text, price, and discount on the order lines.
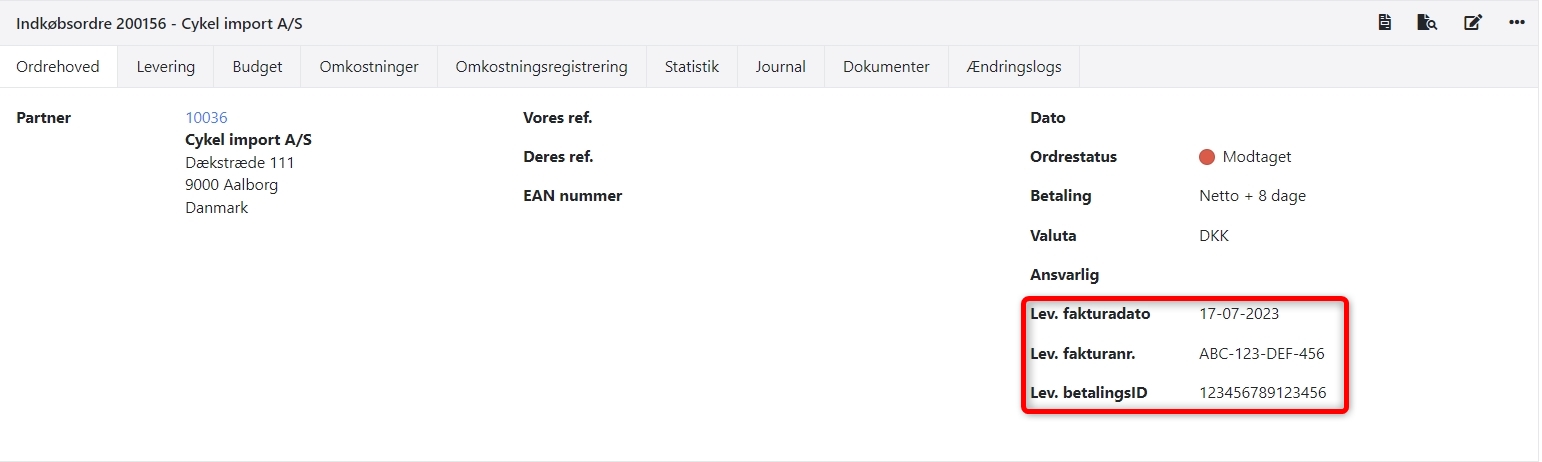
3: Post invoice
Remember to enter the supplier's invoice date, invoice number, and optionally payment ID on the Order header tab. Also verify that prices and quantities on the article lines match the supplier's invoice. Check the invoice total at the bottom of the order as well.
Select Create invoice in the order menu. If you use stock management and have not previously posted a delivery, remember to tick the Deliver field.
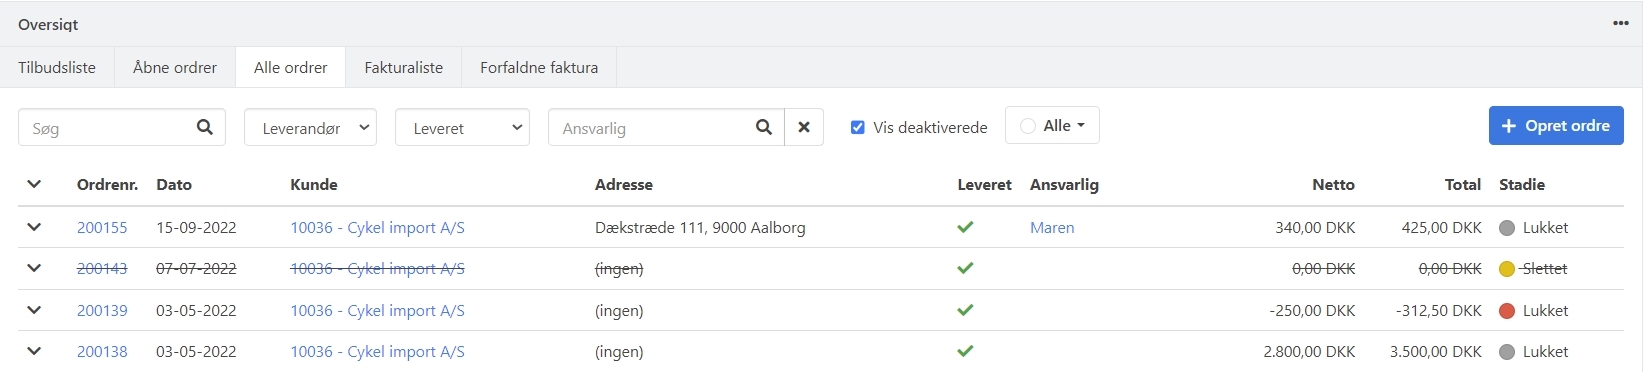
Delete an order
To delete an order, there must be no posted deliveries or invoices on the order. When an order is deleted, it gets the status Deactivated and is not automatically shown in your order overview.
Select Delete in the order menu (three dots) and click Approve. When the order is deleted, all associated order tasks are physically deleted. Only the order number itself can be restored afterwards.
If you want to restore a deleted order, open the order and select Restore in the order menu. The order will then be visible again in your overview of open orders.
Split and merge order
Xena has a function where you can split and merge order lines from open orders on a partner to a new order.
➡️ Read more about split and merge order
Searching for orders
You can search your orders directly from the order overview.
➡️ Read more about searching for orders
Other functions
Confirmed prices
When you confirm an order line, its price is locked. The price does not change automatically even if you later adjust the order date or exchange rate. This prevents unintended price changes on confirmed articles.
Partial invoicing
You can create multiple invoices on the same order by dividing the order into different tasks. This is practical, especially if you have a larger order for the same partner. You can perform partial invoicing of the individual tasks.
Documents
Each time a document is generated from the order, it is automatically saved under the Documents tab on the order. This allows you to look back at previous documents, such as quotes, even after the order has been invoiced. You can also upload documents to the order yourself. Documents can be organised in document folders.
Statistics
All orders have a tab with statistics, where you can see key figures and a graphical view of actual vs. budget.
➡️ Read more about order statistics
Copy
You can copy an order to a new order by selecting Copy to new sales or purchase order in the order menu (three dots). Similarly, you can copy a single task to the same order via the task menu and select Copy.
Credit note
An invoice can be credited with a single click. Find the desired invoice and select Credit note in the invoice menu (three dots). This creates a new task on the order that credits and settles the selected invoice(s). Both invoice and credit note are created on the same order. If you need to create a new invoice, you can use the copy function described above.
Invoice by consumption
If you post costs on your sales orders, you can create an invoice based on the posted costs. This saves you time and ensures that all your costs are invoiced to the customer.
➡️ Read more about cost-based invoicing
Progress invoicing
In the order menu (three dots), you will find Progress invoicing. This type of invoicing is used when the customer is to pay for the order in instalments. The instalments can be calculated as a percentage of the total amount for the task (completion principle) or as an agreed amount (instalment principle).
➡️ Read more about progress invoicing
- Updated