Ledger entry
In the Ledger Entry, you can perform manual bookkeeping, import FIK notifications, create accruals, and post bank transactions from the bank reconciliation.
The Ledger Entry provides a simple and efficient way to enter and reconcile postings. Essentially, you can book everything in Xena here, including financial vouchers, purchases/sales, and incoming/outgoing payments.
When all vouchers are entered and reconciled, you will see the opening balance, movement, and closing balance for the accounts and partners used at the bottom of the ledger. This makes it easy to reconcile accounts before posting the ledger.
If the lines are transferred from Bank Reconciliation, the bank transactions are automatically marked as reconciled when the ledger is posted.
➡️ Read about Bank Reconciliation here
Functions in the Ledger Entry
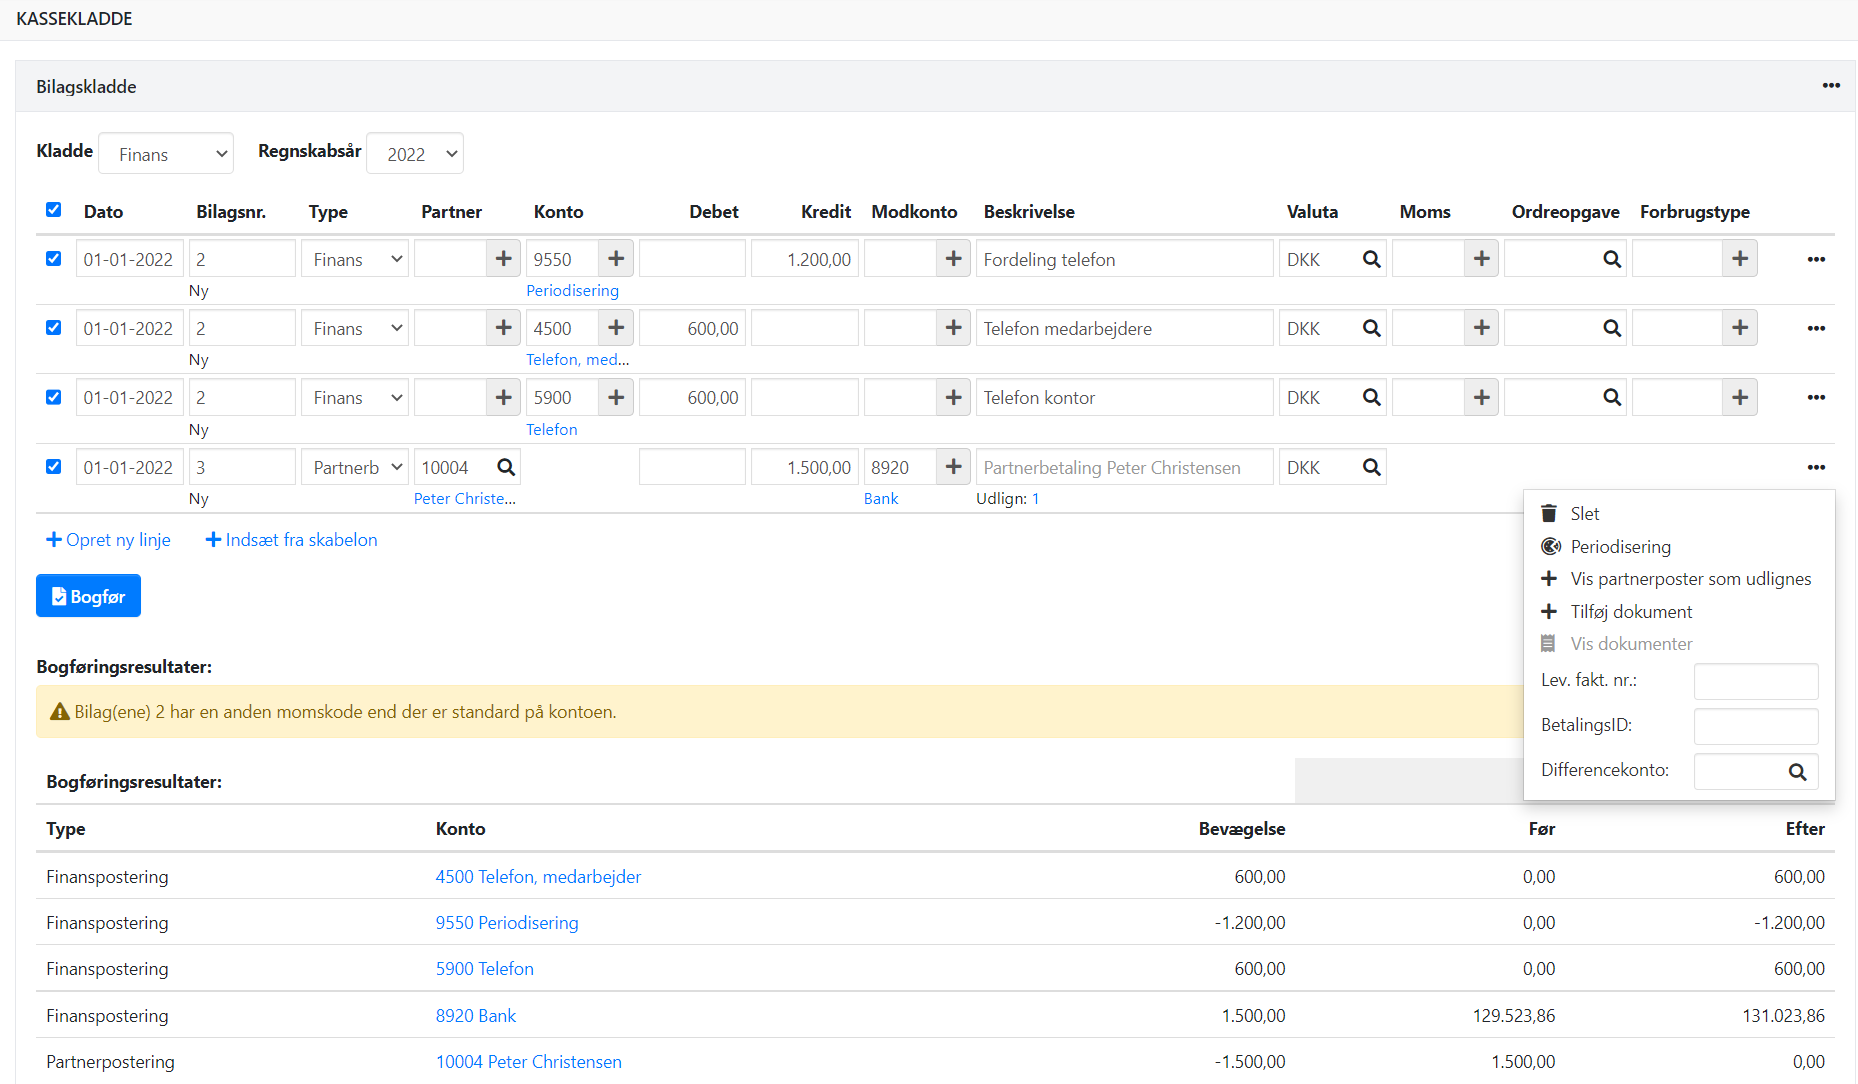
Open the Ledger Entry via Finance > Ledger Entry. The main screen is divided into an input section at the top and a reconciliation section at the bottom.
Voucher Number and Fiscal Year
- Ledger: Create ledgers under Settings > Finance Setup > Ledgers. Here you can also adjust the next suggested voucher number (only upwards).
- Fiscal Year: Select the year you want to post in. The next voucher number is retrieved from the selected year, and it is only possible to post in one year at a time.
Ledger Lines
When creating a line, you can enter details such as date, voucher number, type, account, partner, amount, contra tag, description, and more. The line type determines how the amount is posted:
- Financial: Used for manual posting of sales, purchases, salaries, and other entries. The amount is posted with the sign you enter, and the contra account with the opposite sign. A partner can also be used as a contra account.
- Partner Payment: Post incoming or outgoing payments on a partner. The amount is posted with the sign you enter, and the contra account with the opposite sign.
- Customer Fees: Used to post or reverse interest/fees on customers. The amount must be credited or debited depending on whether it is being added or reversed.
Other Fields:
- See in the guide how to use shortcut keys for quick date selection
- Description: Enter a clear description for the voucher. Writing “Insurance” on an insurance account provides little help later. Write something short that explains as much as possible.
- Contra Account: Only financial accounts of type Payment Account can be selected
- VAT Code: Automatically retrieved from the account but can be overridden
- Currency: Must have an exchange rate for the selected date
- The three-dot menu gives access to less common functions, such as attaching documents or entering the supplier’s invoice number for later payment transfer.
Once you have selected the type and filled in the fields, you can reconcile postings for the partner directly via the link under the description.
➡️ Read more about reconciling postings
The Ledger Entry in general
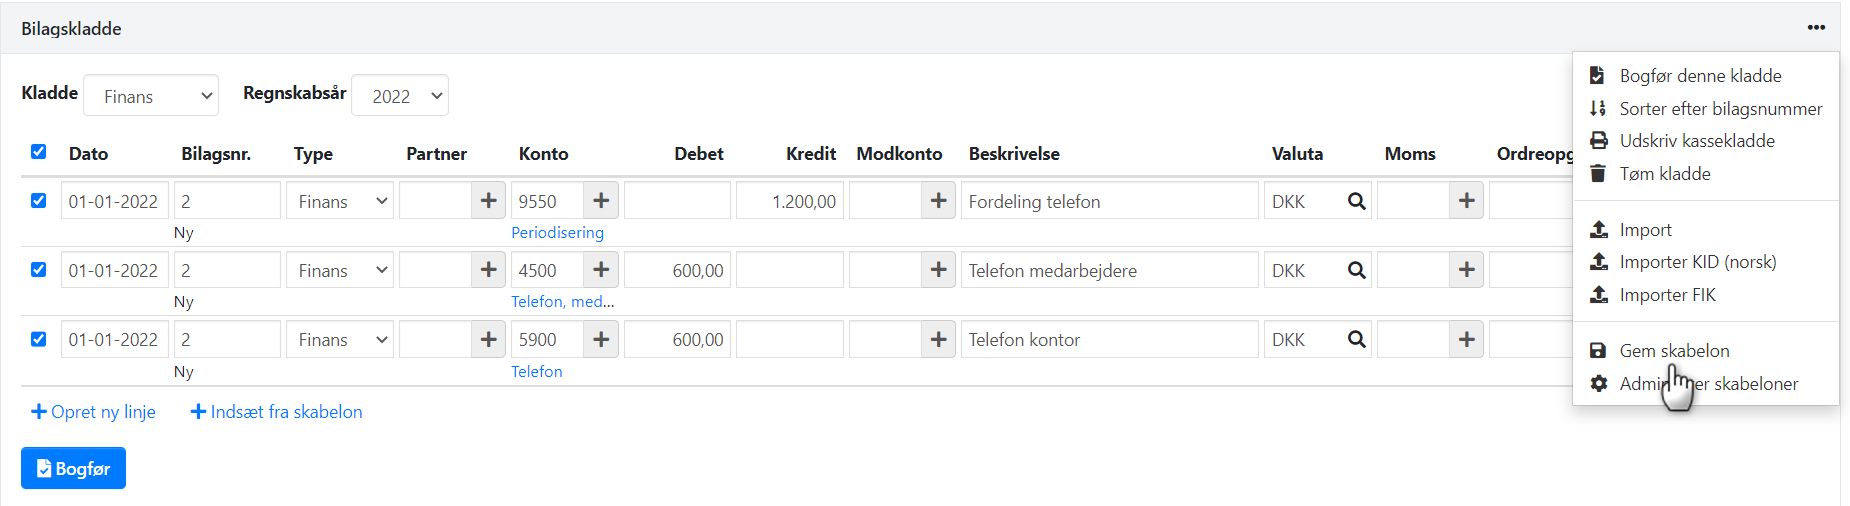
The menu at the top right provides access to sorting lines by voucher number, clearing the ledger, importing postings from CSV, importing FIK notifications, and managing templates.
You can choose to post lines immediately or save them for later. Selecting or deselecting a line automatically affects lines with the same voucher number. Opening balance, movement, and closing balance only reflect the marked lines.

Shortcut Keys
- Arrow keys forward or backward, and tab/shift+tab move to the next or previous field.
- Tab in the last field on a line moves to the first field in the line below and creates a new line if necessary.
- Arrow key down creates a new line if necessary.
- Arrow keys up and down move the cursor between lines in the same field.
- CTRL - (minus sign) deletes the selected line.
- CTRL+ (plus sign) inserts a new line above the selected line.
- Ctrl-Alt-arrow down moves the line down.
➡️ See the overview of all shortcut keys in Xena
Templates
Templates are used for recurring postings. You can save existing ledger lines as a template and insert them later.
- Enter ledger lines you want to save as a template for later use
- Select Save Template in the top-right menu
- Choose to save a new template or overwrite an existing one
⚠️ Note: Attached documents are not saved with the template.
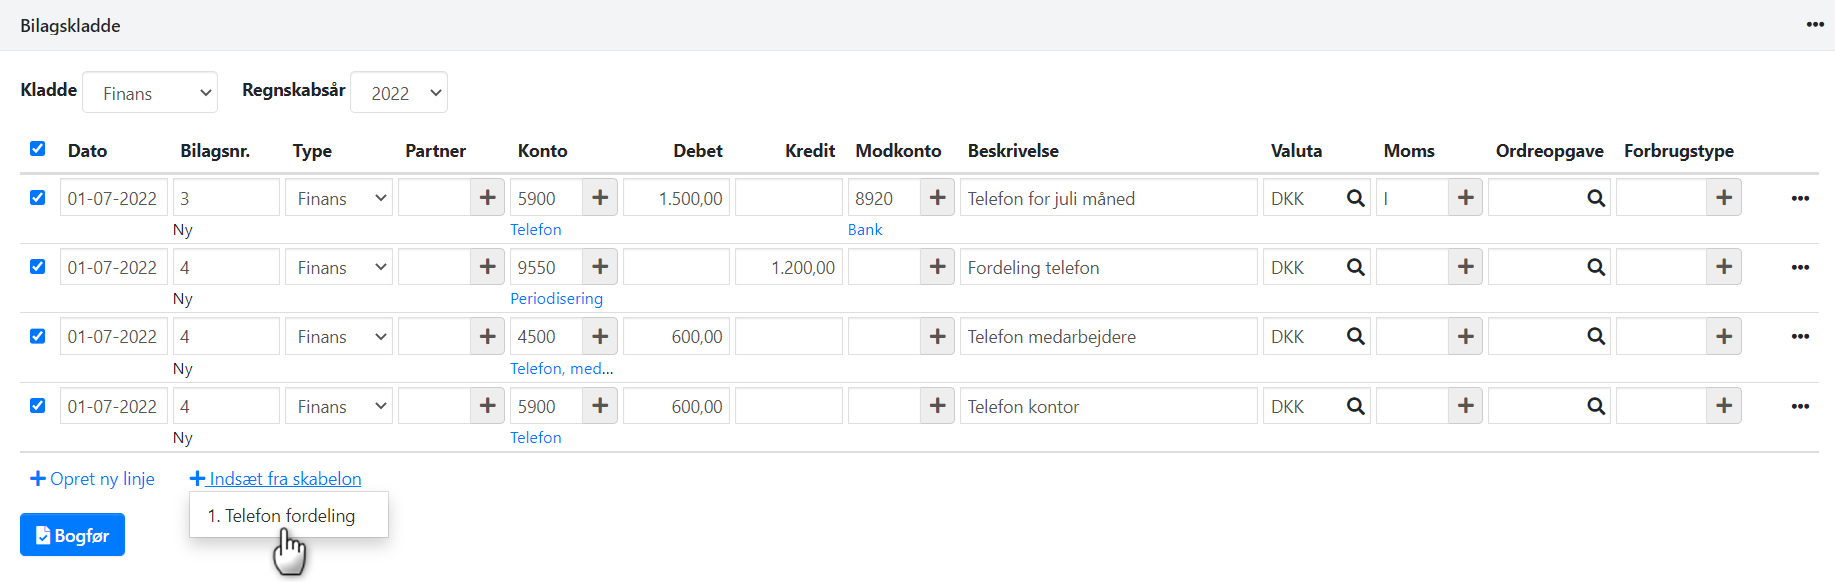
Once your first template is saved, you will find the link Insert from Template at the bottom of the ledger.
When inserting lines from a template, the voucher numbering follows the template’s structure, and the date is set to the most recently added line in the ledger.
You can retrieve an existing template, make changes, and save it again to update it.
- Make the desired changes to lines retrieved from the template
- In the menu, select Save Template
- Choose to overwrite an existing template
- Select the template you started with in the ledger and click Save
Accruals
To accrue a previously posted expense, you must first create an accrual account with financial account type "Payment Account". Once the account is created, you can generate accrual postings in the Ledger Entry as follows:
- Add a ledger line with date, expense account, amount, and description
- If the account has a VAT code, remove it from the line
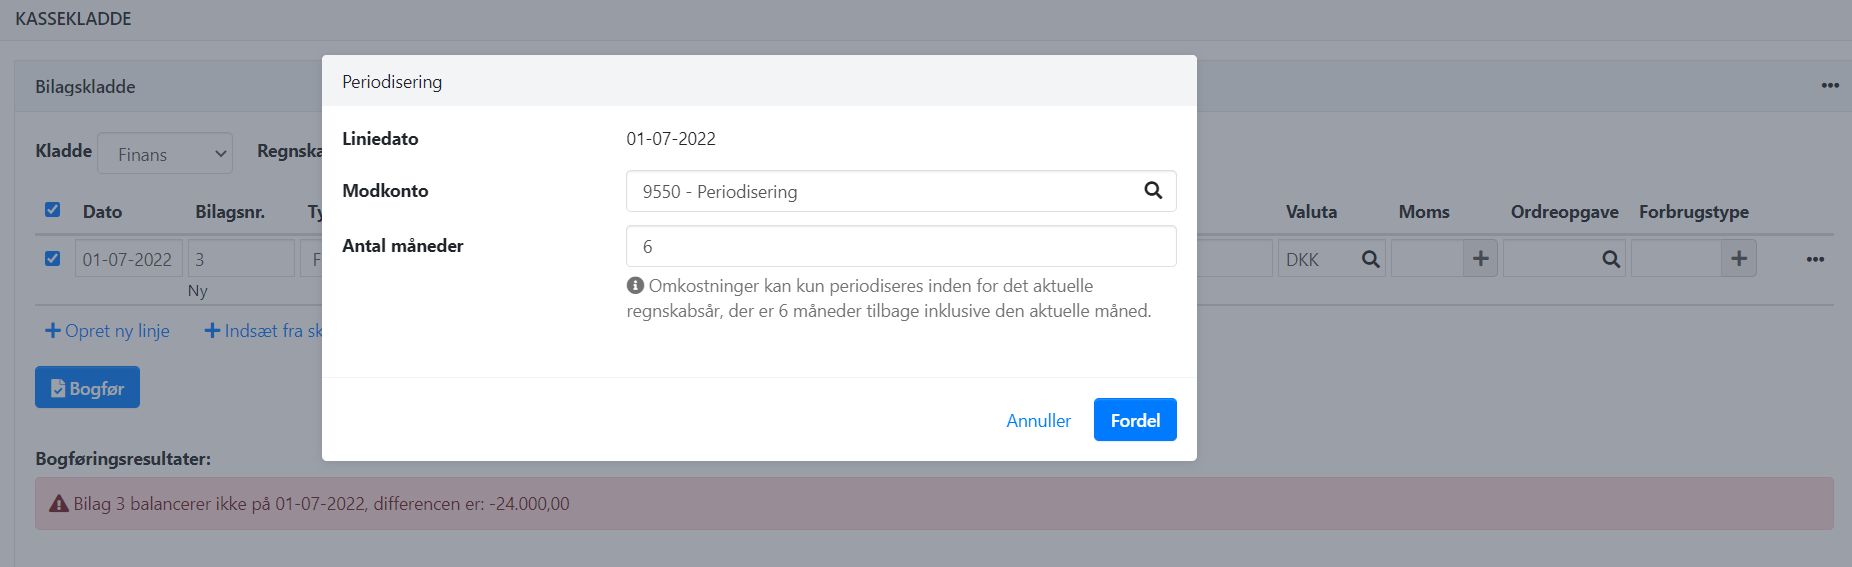
- Select Accrual in the line menu. Specify the accrual account and number of months
- Click Distribute to get suggestions for accrual postings
⚠️ Accruals can only be performed within the same fiscal year
- Updated